Home
Umbilical Infections in Foals
By Lauren Lamb, DVM
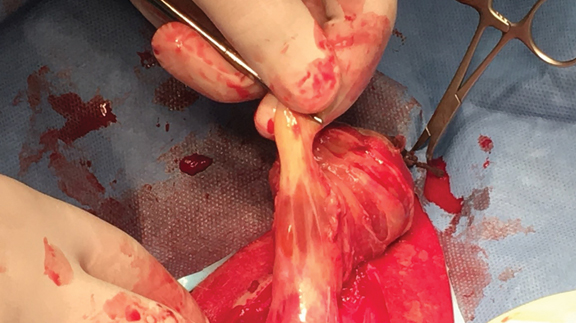
The umbilical stump (navel) is the remnant of the umbilical cord. The umbilical cord contains large vessels (umbilical artery and vein), which transport blood between the fetus and the placenta within the uterus. The umbilical cord also contains the urachus, which is a tube that is responsible for carrying urine from the foal’s bladder to a portion of the placenta. The umbilical cord will rupture one to two inches from the foal’s body wall when the mare stands after giving birth. Just prior to the umbilical cord rupturing, the blood flow within the umbilical artery and vein will stop. The umbilical remnant will contain the umbilical artery, vein and urachus.
The umbilical remnant, in a newborn foal (first few hours), will look like a moist string or worm hanging down from the foal’s belly button. Within 24 to 48 hours, the umbilical remnant should shrivel up and look like a dry twig or scab. The umbilical remnant should be dipped in dilute 1 percent iodine betadine three to four times within the first 24 hours of life. The iodine will help dry the umbilical remnant and prevent bacteria from traveling up the remnant and entering the foal’s body. The dried portion of the umbilical remnant should remain dry and eventually fall off as the foal ages. To help decrease the chances of an umbilical infection, always use exam gloves when palpating the umbilical remnant.
Clinical signs that a foal has an umbilical infection can vary depending on the location of the umbilical infection.
Foals with a local umbilical infection will have swelling around the umbilical remnant, purulent drainage (pus) from the remnant and pain and/or heat on palpation of the umbilical remnant. Signs of systemic infection include fever greater than 102 degrees Fahrenheit, diarrhea, increased respiratory effort and rate, depression, recumbency, decreased appetite/loss of suckle, colic, swollen and painful joints, along with general signs of a local infection mentioned above. Some foals with a local or systemic infection will start to dribble urine from the umbilicus. This urine is coming from the urachus, which is connected to the bladder, and has become patent following an infection of the umbilical remnant. Urine dribbling from the umbilical remnant can be seen when the foal urinates.
Systemic infection will occur when bacteria migrates up the umbilical remnant and enters the foal’s blood stream. When bacteria enter the blood stream, a foal’s joints and growth plates are at increased risk of becoming infected. This increased risk of infection is due to a unique blood flow at the foal’s growth plates and around the joints. Two factors that can increase the chance of a systemic infection include low IGG levels, also known as failure of passive transfer (lack of colostrum), and not dipping the umbilical remnant in 1 percent iodine.
Foals with an umbilical infection will also have an increase or decrease in the number of white blood cells, depending on how long the infection has been present. The Serum Amyloid A (SAA), which is a protein in the blood that is produced in response to infection or inflammation, will be increased. An ultrasound exam of the umbilical remnant can be used to definitely diagnosis an infection of the umbilical remnant and patent urachus. Pus can be seen within the umbilical artery and/or vein with an ultrasound exam.
Treatment options for an umbilical remnant infection consist of medical and/or surgical therapy. Depending on the overall health status of the foal and the type of infection (local vs systemic), your veterinarian will be able to recommend which option is best for your foal.
Read the April issue to learn more!
Home
Simple and Effective Ways to Reduce Reliance on Public Utilities

In today’s world, our reliance on public utilities such as electricity, water, and natural gas is undeniable. However, there is a growing movement towards greater self-sufficiency and sustainability. Many people are exploring ways to reduce their dependence on these public services, both to save money and to contribute to a more sustainable future. In this article, we’ll discuss some simple yet effective ways to reduce reliance on public utilities.
1. Generate Your Own Electricity
Generating your own electricity is one of the most significant steps towards reducing reliance on public utilities. Here are some options to consider:
Solar Panels: Installing solar panels on your roof or property can harness the power of the sun to generate electricity. Solar energy systems can provide a significant portion of your electricity needs and often come with government incentives and tax benefits.
Wind Turbines: If you have a suitable location, small wind turbines can generate electricity from wind power. Wind energy can be an excellent complement to solar panels, especially in windy areas.
Backup Generators: While not a primary source of electricity, backup generators, such as those powered by propane or natural gas, can provide power during outages and reduce your reliance on the grid.
2. Use Energy-Efficient Appliances
Upgrading to energy-efficient appliances can significantly reduce your electricity consumption. Look for Energy Star-rated appliances, LED lighting, and smart thermostats that help you manage and reduce energy use.
3. Invest in Insulation and Weatherization
Proper insulation and weatherization of your home can help maintain a comfortable temperature year-round, reducing the need for heating and cooling. Seal gaps and cracks in your home’s structure, add insulation in attics and walls, and consider energy-efficient windows and doors.
4. Collect Rainwater
Installing a rainwater harvesting system allows you to collect and store rainwater for non-potable uses, such as watering your garden or flushing toilets. This reduces your reliance on municipal water supplies, especially during droughts.
5. Compost and Reduce Food Waste
Reducing food waste not only saves money but also reduces the energy and resources needed to produce and transport food. Composting kitchen scraps and yard waste can help enrich your soil, reducing the need for chemical fertilizers.
6. Install Low-Flow Fixtures
Low-flow showerheads, faucets, and toilets can significantly reduce water usage without sacrificing functionality. These fixtures reduce water bills and ease the demand on public water supplies.
7. Practice Off-Peak Energy Use
Many utility companies offer off-peak rates, where electricity is cheaper during specific hours. Shift energy-intensive tasks like laundry and dishwashing to these off-peak hours to save money.
8. Reduce Water Heater Temperatures
Lowering the temperature of your water heater can reduce energy consumption. Most households don’t need scalding hot water, and a moderate temperature is often sufficient for daily use.
9. Switch to Propane or Natural Gas
In some cases, switching to propane or natural gas appliances can be more energy-efficient and cost-effective than electric alternatives. For example, propane-powered stoves and water heaters can provide efficient heating.
10. Install Energy-Efficient Windows and Doors
If you’re considering home renovations, invest in energy-efficient windows and doors. These can better insulate your home, reducing the need for heating and cooling.
11. Create an Energy-Efficient Landscape
Planting trees and shrubs strategically around your home can provide shade in the summer and windbreaks in the winter, reducing the need for heating and cooling.
12. Learn Basic Home Repairs
Knowing how to perform basic home repairs can help you maintain your home’s systems more efficiently. Simple tasks like fixing leaky faucets, insulating pipes, and sealing drafts can make a significant difference.
13. Consider Alternative Transportation
Reducing your reliance on public utilities extends to your transportation choices. Consider walking, biking, carpooling, or using public transportation to reduce fuel consumption and emissions.
14. Invest in Energy Storage
Battery technology has advanced, making it possible to store excess electricity generated by solar panels or wind turbines. These batteries can provide power during outages or during peak demand times when electricity prices are high.
15. Educate Yourself
Staying informed about energy-efficient practices and technologies is essential. Consider taking courses, attending workshops, or reading books and articles on sustainability and self-sufficiency.
Reducing reliance on public utilities is a journey that involves a combination of lifestyle changes, home improvements, and technology adoption. While it may not be feasible or practical for everyone to completely disconnect from public services, even small steps can lead to significant reductions in utility bills and environmental impact. Whether you choose to generate your own electricity, conserve water, or practice energy-efficient habits, every effort contributes to a more sustainable and self-reliant future. Ultimately, these changes not only benefit your wallet but also help preserve our planet for future generations.
Home
Butter Pecan Ice cream

Total Time: 4 hours
Yields: 1 1/2 Quarts
- Ice cream base:
- 6 large egg yolks
- 6 tablespoons unsalted butter
- 1 cup brown sugar
- 1/4 teaspoon salt
- 2 cups heavy cream
- 2 cups whole milk
- 1 teaspoon vanilla extract
- Pecans:
- 1 cup pecans
- 1 tablespoon unsalted butter
- Pinch salt
- Instructions:
- In a medium sized heat-safe bowl, whisk together the egg yolks until well blended. Add brown sugar and salt and mix until incorporated. Set aside.
- Pour the cream into a metal bowl set in a larger bowl of ice and set a medium-mesh sieve on top. Set aside.
- In a medium, heavy-bottomed saucepan on medium heat, melt the butter and cook it, stirring constantly, until it just begins to brown.
- Slowly add the milk, stirring to incorporate. It will foam up initially, so make sure you are using a pan with high enough sides. Do not let boil or the mixture may curdle.
- To temper the eggs, slowly pour half of the milk and butter mixture into the eggs, whisking constantly to incorporate.
Then add the warmed egg mixture back into the saucepan with the remaining milk and butter mixture.
- Stir the mixture constantly over medium heat with a wooden or heatproof rubber spatula, scraping the bottom as you stir, until the mixture thickens and coats the spatula, about 5-7 minutes.
- Add vanilla and stir until cool over the ice bath. Chill thoroughly in the refrigerator.
- While the mixture is chilling, preheat the oven to 350°F. Melt 1 tablespoon of butter. Toss with pecans and a pinch of salt. Spread pecans out on a rimmed baking sheet and bake at 350°F for 10 minutes, until the pecans are lightly toasted. Set aside to cool. Once cool, roughly chop the pecans and set aside.
- Once the ice cream mixture is thoroughly chilled, churn in your ice cream maker according to the manufacturer’s instructions.
- Once the ice cream has been formed in the ice cream maker, it will be fairly soft. Fold in the chopped pecans.
- Put in an airtight plastic container and place in the freezer for at least an hour, preferably several hours. If it has been frozen for more than a day, you may need to let it sit at room temperature for a few minutes to soften it before serving.
Home
Valentine’s Crack

Servings: 30
Total
Time: 13 minutes
- 50 Saltine Crackers
- 1 Cup butter cut into chunks to melt down, 2 sticks
- 1 Cup LIght Brown Sugar
- 2 Cups White Chocolate Chips
- 1/4 Cup Pink Chocolate Melts
- Valentine’s Sprinkles
Ingredients:
- Preheat oven to 325 degrees. Line a large cookie tray with aluminum foil. Spray with cooking spray. Line saltines up neatly in rows.
- In a medium sized pot melt your butter and brown sugar. Once butter is melted down, bring to a boil. Continue to stir the entire time and boil for about 2 minutes. It will look bubbly and look like caramel.
- Pour over the top of the saltines. Gently spread across the saltines.
- Place in oven and bake for about 7 minutes.
- While in the oven melt your pink chocolate melts according to package directions.
- Remove the pan from the oven and then sprinkle your white chocolate chips over the saltines. Your hot toffee mixture will melt the chips. You can put it back in the oven for a minute to move the process along. Once your chips are melting, spread across the top evenly with a spatula.
- Mix your pink chocolate into the white chocolate by pouring it over the top in a decorative way. You can use a knife tip to help combine colors to your liking. Quickly decorate with sprinkles, the melted chocolate will act as your glue.
- Once chocolate is completely hardened you are ready to serve.
-

 Attractions8 years ago
48 Hours in Atoka Remembered
-

 Country Lifestyle9 months ago
July 2017 Profile: J.W. Hart
-

 Country Lifestyle9 years ago
The House a Treasure Built
-

 Country Lifestyle4 years ago
The Two Sides of Colten Jesse
-

 Outdoors7 years ago
Grazing Oklahoma: Honey Locust
-

 Equine8 years ago
Umbilical Hernia
-

 Outdoors5 years ago
Pecan Production Information: Online Resources for Growers
-

 Farm & Ranch7 years ago
Hackberry (Celtis spp.)


